Saturday, November 17, 2012

Ready, Fire, Aim!

So, we're at the point where we've arrived at the venue, loaded in the show, and got everything hooked up.  It's time to fire up the sound system and see if our preparations have paid off.  If you've got good power, checked all of your cables, and didn't break anything on the way to the gig you should have something that resembles audio oozing out of your speakers now.

What happens now depends on just how elaborate your sound system is.  If you're simply putting vocals through the PA, it's going to be quick and easy.  However, if you're mic'ing up an entire band, then you've got as much as 16 (or more) channels to adjust and then mix all together (I've done regional bands in large clubs that filled up a 48 channel desk).  So, in the next few weeks we'll be covering setting up this aspect of the show, starting simple and getting more complex.

But before we start building a mix, what can we do to make sure it sounds as good as we can make it?  Well, it might surprise you that the physical placement of mics and speakers can make a huge impact.

First, your main speakers.  This may seem really basic, but a lot of bands miss this.  Make sure your speakers are pointing at the intended audience.  If there's a dance floor or "listening" area in the venue, that's what you want to cover.  You do not want to be blasting the bar area.  If bartenders can't hear, they can't take drink orders.  If they can't take drink orders, they don't make any money.  It goes downhill from there.

Having your speakers pointing straight out from the stage area is frequently what you don't want.  Why?  You know those horns in your main PA speakers?  Yeah, the things that spit out all the treble....they work just like a nozzle on the end of a garden hose.  So your sound doesn't shoot straight out, it's in a spray pattern anywhere from 60 to 90 degrees wide.


So while your speaker may look like it's "aimed" at the audience, you could still be directing a lot of acoustic energy where you don't want it...like the above mentioned bar.  Yeah, I know...it looks cooler to have 'em pointing straight out (and I've had to fight this battle).  But I ask you this...did the audience come to see you perform or stare at your PA?  Yeah, that's what I thought.  Now, you go tease your hair and let me finish my job here, OK?

Sending a lot of sound into a wall is not necessarily a good thing either...especially if it's a hard surface or worse yet, glass. 


I recently had an experience setting up a band in a club where one wall perpendicular to the stage was mirror.  All of the vocal mics were set up behind the main speakers, and all of them were behaving well except for the lead vocalist's mic...it was feeding back like crazy.  There were no monitor slants on stage (the band all used in-ear systems), and the mics closest to the mains were not having problems.

Finally, I starting suspecting that we were having reflection issues off the glass.  I used a laser pointer, and starting from main speaker near the mirrors, I scanned down the mirror.  At the edge of horn, I got a laser reflection that shot right back to the lead vocal mic in the center of the stage.  BUSTED!!  We angled that speaker cabinet in about 20 degrees, and the problem was solved.  The entire system sounded better in the back of the room as well.
 

If you're using monitor slants on stage, then this "aiming" thing gets really important.

First, you should be using cardiod patter mics (we'll do a post on just mic patterns on down the road).  For now, you just need to know that a cardiod mic is the least sensative to sound coming from the connector end.  So, you want to aim the monitor down the back of the mic in order to get the most volume from your monitors without feedback.


You'll still likely need to ring the monitor out with EQ (another post).  But this will get you started.

Don't forget about reflections coming off of the ceiling and back wall of the stage.  If you have a monitor feeding back when the performer steps away from the mic, that's likely your problem. 

I had that problem with one band in a normally problem-free room.  The back wall of the stage area was carpeted, but the band had hung a large metal sign directly behind the drumer and the lead vocal mic.  Every time the vocalist moved away from the mic, it was feedback city (and when I turned it down, it wasn't loud enough).  Moving the sign was not an option (egos at play here).  But, what I was able to do was angle the top of the sign out from the wall and moved the reflections down away from the vocal mic.  Unfortunately, I started getting all kinds of crap in the drum mics then and wound up pulling everything but the kick and snare out of the mix.  But hey, it was much more important to have that sign on the wall so the 5 people in the club knew who these guys were.

Here's one I came across earlier this year.  I had set up and rang out the monitor for one of the performers in a band.  I had it nice and clear and loud with no feedback.  However, he steps up to the mic and it's starts squeling uncontrolably.  I'm looking around at what could have changed, and after a few minutes it dawned on me.  He was wearing a cap with the bill down low over his eyes.  When he stepped up to the mic, the sound was reflecting off of the cap and into the mic.  He normally doesn't wear a cap during performance, so I had him take it off.  The problem went away.   So from that, we take away:


Ken's Road Tip #81:  Sound check it like you're going to play it.

That includes checking at the volume level you intend to play at (or actually, a little more).
It's a lot less risky to turn a system down during performance than turn it up to a level you haven't checked at.  And remember that people are really good sound absorbers, so they're going to soak up some of the sound during the gig.  At least, I hope you have an audience to do that. 

Next week, let's talk a bit more in depth about mics, and why you use certain mics in certain applications.  We'll talk about why they are one of the most important investments you make in a sound system.

And I'll leave you with a trivia question....
Q:  What's the best song to end your soundcheck with?

Send me your answers at itsjustlogistics@gmail.com.  Whoever gets it right gets a shameless plug and shoutout next week.

Until next time, keep the meters out of the red!

Ken


Ken Carver has been a musician and performer since the early 70's, and involved with live music production since the mid 70's. He worked for 15 years as a broadcast engineer, building numerous studios and transmitter sites around Texas. He's also worked in Critical Care Communications for the medical industry, R&D for an automated lighting manufacturer, and owned Project Lighting & Sound in the 80's. He currently heads up an R&D Hardware Technician Team at National Instruments in Austin, and still performs on the weekends in the Central Texas area. You can reach Ken at itsjustlogistics@gmail.com

Saturday, November 10, 2012

Higher Ground

Last time, we talked about AC power and its obvious importance and impact on your show. If you look at a North American 120 volt outlet, you see three connection points....known as hot, neutral, and ground. The hot and neutral both have to be there in order for power to be delivered to your gear. But it's that third connection, the ground, that can either save your life or play havoc with your show.

Ground loops...almost everyone has heard of 'em. But, do you actually understand what's happening and why it's causing that loud hum in your equipment? Those of you who do...go get yourself a beverage and meet us back here in a few minutes. Everyone else, get ready to roll us your sleeves and delve into this mystery.

Remember Road Tip #3 from last time?
Thou shalt have one and only one path to ground.

First, lets dispelled a very common misconception about ground. Ground is a reference. It's not a value. So, most folks assume ground is zero volts. Well, it may appear to be in a lot of instances. But if you measure the potential between two different ground points, you're going to see a voltage of some magnitude. This is because we live in an imperfect world.
 
OK, here's a really common place for a ground loop to occur.  If you have a sound board out
front and your power amps on stage (as you should), then electrically it looks like this:


The natural thing for your sound man to do is to plug the console into the nearest outlet, but this is what you wind up with.  With a current flowing on the ground, the 60 Hz (50 for some parts of the world) will wind up being introduced into your main signal.  The further away the console is from the amps, the worse it is.  So, how do you fix it?

You have to break the loop somewhere.  And this is where people get into trouble.  They put one of those 3-to-2 wire adapters on either the amp or the mixer (which should just be outlawed because I've never seen anyone use them correctly).  Everything gets quiet and they thing they've fixed the problem.  And while technically they have "fixed" it, they've introduced a very serious potential problem.  
 
The ground wire in an AC power cord is generally 16 gauge wire, which means it can handle 13 amps without failing.  The ground wire in the mic cable that's connecting the mixer and the amp, however, is probably more like 22 or 24 gauge (as the numbers get bigger, the wire gets smaller).  The max current that wire can take is about 2 amps.  At that point, it's probably going to burn up.
 
So, in the event of a short, your ground wire in the mic cable has a good chance of failing...leaving the chassis of mixer energized.  Then when you touch it, YOU become the path to ground.  Not pleasant at all.
 
So, how should this be dealt with?  One way is to plug the mixer into the same outlet as the amp.  This means running an extension cord along with your snake, but if you've prepared your cables correctly then it's no big deal.
 
The best way is to lift the ground on one end of the audio cable (the blue wire in the diagram).  This is what I will do in permanent installations.  Typically, I'll leave it grounded at the console (since everything has to run through that) and lift it at the amp.  That's really the best solution, since everything now has a solid AC ground connection and the loop is broken.
 
There are other solutions available that will accomplish this with varying results.  Using an isolation transformer in the audio link will break the ground loop as well.  This is how you would use a transformer to break the loop in an unbalanced audio line.


The transformer couples the audio (the process is called "mutual inductance" if you really want to get your geek on and Google it).  But sinces there is not direct connection between the two devices, there is no loop.


The only downside to this is that unless you use a high quality transformer, your audio quality will suffer.  By the way...if you've ever wondered what's in a passive DI box, you're looking at it.

There are also "ground filters" out there which use a variety of methods to treat ground loops.  That are IMHO at best band aids, and at worse tourniquets (and you know what happens if you leave a tourniquet on too long).  Let the ground connections do their job protecting you...fix the loop on the audio side.

And now, the question of "why does the mic shock me"?  If you have your mic plugged into a mixer and then into an outlet, then all of those components are at one ground potential.  Then, you plug your guitar into your amp and the amp into an outlet.  Now you've got all of those things at another ground potential (unless you plug them into the same outlet as the mixer).  

So when you have your hands on your strings (which are also grounded on most electric guitars) and walk up to the mic and touch it with your lips, you've just completed the ground loop.  That wonderful tingle you feel is the current flowing!

How do you fix that?  There are a few things you can do.  Some people advocate putting capacitors in series with the ground wire in your guitar going to the bridge (and ultimately the strings).  I won't go into the math behind this (email me if you want to see it), but it still goes against my mantra of not jacking with a ground wire.

I've seen some guys carry their own "uni-ground" power distro systems.  It amounts to a series of outlet boxes that plug into an outlet close by, but only use the hot and neutral.  The ground wire then snakes between the boxes and ultimately ties to one plug.  It works just fine on paper, but it's a cluster to carry around and deploy.

The one sure way I've found over the years to solve the "gettin' shocked by the mic" syndrome is to use a wireless device...either with the mic or on your guitar.  Then, you've absolutely broken the ground path between the guitar and the amp.  There are some really decent wireless guitar systems out there now for under $200 (unlike my first one I got in the mid 80's for $2000).  Plus, you've got one less cable to tangle up on stage.

Next week, let's get back into the audio world (because let's face it...it's a lot more exciting than talking about power and ground).  In fact, I see a few weeks in sound world coming down the pipe.

And I've received a couple of emails asking this, so I'll bring it up here.  If there's something specific you would like to see addressed, let me know.  I've got a list of topics I'm planning to write about that goes into mid 2013, but they're in no specific order.  Feel free to drop me a line any time if there's a problem or situation you're trying to work through.

Until next week, keep the meters out of the red.


Ken Carver has been a musician and performer since the early 70's, and involved with live music production since the mid 70's. He worked for 15 years as a broadcast engineer, building numerous studios and transmitter sites around Texas. He's also worked in Critical Care Communications for the medical industry, R&D for an automated lighting manufacturer, and owned Project Lighting & Sound in the 80's. He currently heads up an R&D Hardware Technician Team at National Instruments in Austin, and still performs on the weekends in the Central Texas area. You can reach Ken at kcarvertx@gmail.com

Friday, November 2, 2012

More Power To You!

Ask any working band what's the most important thing they need for a good show, and they'll likely name off a myriad of items, substances, or mental states. And while something can be said for all of that, they'll likely miss something much more basic.

Namely, electrical power. 

Electricity...juice, power....whatever you call it everything from your vintage Marshall to your modern PA system needs it. We don't think about, because most of the time we just plug in and it works. But like the liquor you get from the bar...it can vary wildly in quality. And sometimes, how you plug everything in can make a difference as well.

When going into a new venue (or one I haven't played in a while) the first thing I do is assess the power situation. The things I want to know are: 


  - What outlets are live and wired correctly
  - What outlets are on what circuit breakers.

The first is pretty simple if you have an outlet tester like we described last week. The second is a little more challenging, but with the proper tool can be accomplished. This is where I break out the trusty circuit sniffer.


This device is actually sold for the purpose if identifying what breaker controls an outlet (and that's a handy thing to know if the breaker panel is accessible). But what I'll use it for is to figure out what outlets are on the same breaker. For the purpose of finding shared outlets, just plug in the transmitter and go around to different outlets with the "sniffer". If it beeps, the two outlets are on the same circuit. No beep...you've found a separate circuit.  Quite the handy thing to have...it will set you back about $40 at Lowes or Home Depot.


Electrical codes (for the most part) say you can have up to 4 outlets on a single breaker. What we want to do (at a bare minimum) is to try to find at least a couple of different circuits...especially if you're carrying any appreciable amount of lighting. The idea here is to get your sound on one breaker and the lighting another.


The advantage to doing this is two fold. First, you're more likely to trip a breaker with a lot of lighting than you are with your sound gear (unless you're just carrying an insane amount of both). If you do blow the lighting breaker, you don't stop the show completely.


Second, lighting tends to be more of a noise maker as far as the power line goes (it's referred to as Conducted Emissions in UL speak). Keeping your sound on a separate circuit helps keep some of this garbage from coming out of your speakers. We'll talk more in a bit about electrical power quality. For now, we're more concerned with quantity.

Grounding is one of those things that everyone has heard of, knows it's important, but really can't explain. There have been volumes written on the subject, and there can be some really hairy mathematics associated with the principles. If you want to know that stuff, it's out there. However, this discussion is all about putting a show on...not a math lesson.

A functioning ground performs a couple of important functions for us.
  • In the event of an internal short in a piece of gear, it gives the current a return path other than you!
  • It gives the noise, buzz, and hum that your cable shields pick up somewhere to go besides your amp.
The first is an obvious safety issue. This is why you've always heard that you shouldn't defeat or remove the ground pin on an AC plug. I know, this is where you tell me "...but my stuff hums if I don't do that." We'll talk more about that next time, but for now know that the reason you have a hum is because you have multiple ground paths and you have violated the cardinal rule in audio system grounding:

Ken's Road Tip #3 - Though shalt have one and only one path to ground.
  
Some clubs and venues have the power thing figured out. They will have a few dedicated circuits on stage for the bands use. Where you have to be careful is in those venues where bands were an after thought. If there are outlets on the stage area (ie; corner of the dance floor), it's quite possible they were run from the beer cooler, air conditioner, or the signs on the outside of the building (I've seen this one first hand). While your sound checking, listen to your gear for changes in sound quality, hums or buzzes that come and go, or any other gremlins that might plague your performance.

Of course, short of carrying your own power distribution system and pulling your power from the electrical service entrance (this is how we did it when we were carrying 64,000 watt lighting rigs), then you're at the mercy of the club wiring. The best thing you can do it make sure you have some decent amount of power conditioning/filtering between your equipment and the outlet.

Lets talk about what constitutes "decent" power conditioning. A decent power conditioner will provide a path to ground for noise that is on the lines prior to getting to your gear. It will also function as a clamp for any high voltage spikes that come along. Spikes...I've seen them as high as 300 volts on a 120 volt line. They happen when motors or compressors (the refrigeration kind) start and stop. They typically only last a fraction of a second, but the detrimental effects are cumulative. You want the conditioner to take the brunt of this abuse...not your gear.
  
A "decent" power conditioner is not one of those strips you get for 3 bucks at the check out line at Walmart. Those things might have some clamping in them, but they're typically so slow to react that the majority of the spike gets through before they kick in. Nope, this is one of those times where you get what you pay for.

Personally, I like the power conditioning gear from Tripp, Furman (not the RackRider stuff...it's crap unless you rebuild it), APC, and Monster. Whether you get the rack mount stuff or the power strips, make sure that you've got something protecting your investments.

Here's something that doesn't get mentioned much...power conditioners wear out! Yep, you read that right. Remember when I said that the damage from spikes adds up over time? Well, there's a component inside power conditioners that absorbs these spikes (it's called a "varistor" if you're curious) that does break down over time.

So how do you know when it's past it's prime? Some of the better conditioners have an indicator to tell you. For my stuff, I have the ability to check it on a test bench (which I do twice a year). For everyone else, I would recommend replacement every 5 to 10 years or if your gear has gone through a major electrical event (noticeable power surge, nearby lightning strike, etc). It's a lot cheaper to replace a couple of hundred bucks worth of power conditioners than it is a few thousand dollars worth of gear.

With more and more gear being essentially dedicated purpose computers, it's getting more and more important to deliver clean power to your equipment. One thing we haven't talked about is voltage regulators. These are a different animal from conditioners, in that their purpose in life is to make sure that you actually have 120 volts delivered to your gear...not 105 (less than optimal), or 140 (really bad).

Regulators actually turn the voltage up and down as needed to keep a consistent output. The really good ones use a multi-tap transformer, but they can be heavy and are expensive (typically north of $500). The less expensive ones perform the function using solid state devices, but the downside is they introduce their own noise. If you're carrying any significant amount of digital equipment (keyboards, mixers, etc) you owe it to yourself to look at adding voltage regulation to your set up. They even make a difference with tube amps, and help cut down on that "man...my amp sounded great earlier...what happened" syndrome.

Next time, we'll wrap up our discussion on power by going into more detail on grounding and the potential issues (there's a pun in there) that you can run into. And we will attempt to answer that age old question, "Why is my mic shocking the $#!+ out of me?"

Until next time, keep the meters out of the red!

Ken


Ken Carver has been a musician and performer since the early 70's, and involved with live music production since the mid 70's. He worked for 15 years as a broadcast engineer, building numerous studios and transmitter sites around Texas. He's also worked in Critical Care Communications for the medical industry, R&D for an automated lighting manufacturer, and owned Project Lighting & Sound in the 80's. He currently heads up an R&D Hardware Technician Team at National Instruments in Austin, and still performs on the weekends in the Central Texas area. You can reach Ken at kcarvertx@gmail.com

Saturday, October 27, 2012

What's In Your Tool Box?

If you're a musician who uses electricity and cables in the course of your performance, then you need to read this post.  


There are a couple of basic facts in life that directly affect you and your performance:
 - Cables are the the weak link in most audio systems
 - There are a lot of ways for the electrical system in a building to be screwed up


Let's talk about the power first.  In the coming weeks I'm going to do an article on AC power, grounding, and other related topics.  But for now, this is about your safety and the well being of your equipment.  


The main thing to remember is A Faulty Ground Can Kill You.  Period.  Even the "famous" guys aren't immune to this.  One of the most famous incidents was in 1972 when Les Harvey of the Scottish band Stone The Crows was killed on stage when electrocuted by a microphone.  Gary Thain of Uriah Heep was severely electroducted in Dallas in 1974 and never really recovered.  Ace Frehley of KISS got a 220 volt jolt due to a ground fault between his guitar amps and stair railing on the stage set of the Destroyer tour in the late 70's (and yes, that was the inspiration for his song Shock Me).


So, how do you know if that cruddy outlet you're plugging your PA system into is wired correctly?  You spend $5 and get yourself an outlet tester:


That's what I live for...two yellow lights!  Buy plugging this in, I know that:
  • The outlet is actually functioning (it's no fun troubleshooting equipment when the problem is the outlet is dead).
  • The outlet is wired to the correctly polarity (more on that in our AC power article)
  • Most importantly, we have a functioning ground
Knowing that the ground is intact means that the noise and hum that gets on the shields of our cables has a place to go.  But more critical is that in the event of an electrical fault in our equipment, the AC current has a place to go besides through us!  


You can pick these things up at home improvement stores (Lowe's, Home Depot).  Think of it as a $5 life insurance policy.  I check every outlet at a new venue before plugging in anything.


And then there are cables.  It's not "if", but "when" are they going to fail.  Buying (or in my case building) quality cables helps, but at some point someone is either going to pull the wire from the connector or roll the road case with all of the mic stands over one.  


So if you have more than a few mic / speaker / instrument cables, you should own a cable tester.


Plugging in this mic cable, I can see that not only are all of the individual wires are good, but it's also wired in phase (yet another future topic).  My long time favorite has been this Behringer CT100, and it's the best $25 I've spent on troubleshooting tools.  It does XLR, 1/4", 3.5mm, RCA, and MIDI.  It also has a latching function on the indicators to catch intermittent shorts or opens.  Other people make 'em (Peavey, Nady, Hosa)...this just happens to be the one I have.  The one thing it's lacking is being able to test Speak-con connectors, so I'm probably looking at getting one to do that since those connectors are becoming a lot more common now.


Keep in mind that a balanced XLR mic cable can have 1 conductor open and still function...just not as well.  You loose your noise cancellation, the signal level drops, and you can have problems with phantom power if you're using that.  So, a few times a year I get the band over to the house and we go through and check all the mic cables.  While we're at it, we run them through a damp bar rag to clean who-knows-what off of 'em.  It's call Preventive Maintenance...and there's yet another future topic.


This is a "luxury" item to a lot of people, but if I've got any question about the power in a building I'll break out my Digital Multi-Meter (aka DMM).

The outlet tester can tell me if an outlet is wired correctly, but it doesn't actually tell me the voltage at the plug.  If you're working where there's permanent power, it's pretty safe to say that the line voltage is going to be around 120V (but not always...more in a moment). However, if I'm playing an outdoor show where we're on generator power, I always check it! I saw first hand several years ago an improperly connected generator take out 2 Mesa Dual Rectifier amps (about $4000 worth of amps up in flames).  If someone had taken 2 minutes to check, they would have seen that the "120V" outlets were actually wired to 277 volts!


Sometimes you run into a situation where you have the opposite problem...low voltage.  There's a club in south Austin I used to play where my digital amp would actually reboot, and the other guitarist's tube amp just sounded bad.  We measured the voltage coming out of the outlet, and found that when the walk-in cooler compressor kicked in, the outlet dropped to 87 volts!  We found another outlet to plug into (and I started carrying a voltage regulator after that).


A DMM is also nice for checking if a wall wart power supply is working or not.  And, you can use it for finding faults in cables (although the cable checker above it a lot easier to use).  The one above is a pretty fancy one that I keep on the bench for troubleshooting.  You can pick up a basic model for about $15 when you get your outlet tester.
You should be carrying a lot more than this in your tool box, such as tools to work on your instrument, batteries, fuses, strings, picks, bail bondsman's phone number, etc.  But these are gadgets I see a lot of folks not carrying.  It's not a lot of money, but they sure lower the aggravation factor!
Since we've kind of started the discussion about AC power and such, we'll continue that next time.  We'll talk about grounding...that's a term that everyone throws around, but I find that very few people actually understand the concept of.  I'll try to take the hyper-tech out of it, and just relate the points that are important to us as musicians and performers.  We'll also talk about balancing your power loads, and I'll show you another gizmo that I find very useful in new venues.


Until then, keep the meters out of the red!


Ken


Ken Carver has been a musician and performer since the early 70's, and involved with live music production since the mid 70's. He worked for 15 years as a broadcast engineer, building numerous studios and transmitter sites around Texas. He's also worked in Critical Care Communications for the medical industry, R&D for an automated lighting manufacturer, and owned Project Lighting & Sound in the 80's. He currently heads up an R&D Hardware Technician Team at National Instruments in Austin, and still performs on the weekends in the Central Texas area. You can reach Ken at kcarvertx@gmail.com

Saturday, October 20, 2012

The "4 x 4" Test...Idiot Proofing Qualified

Let me start this by saying that I'm not calling anyone who reads these little bits o' wisdom an idiot.  Quite to the contrary, I'd like to think that I'm playing to an audience with above-average intelligence.

No, what I'm referring to is the idiot moves that we all make when we're rushed, tired, drunk, or are just having a day where we're suffering from cranial rectosis.  You know, like whenever you have a show to do.

Hooking up a sound system offers literally a hundred or more opportunities to plug something in  wrong.  The well engineered and packaged system will remove as much "thinking" from the process as can be practically achieved.  If the connections are intuitive, logical, and give the proper cues to the person hooking it up, you can save yourself a lot of time and frustration.

Last week, we talked about wiring bundles...putting cables with a common source and destination together. That's all great, but what about when you have 4 or 5 connectors on each end...what do you do?

This is where careful labeling and connector selection come into play.

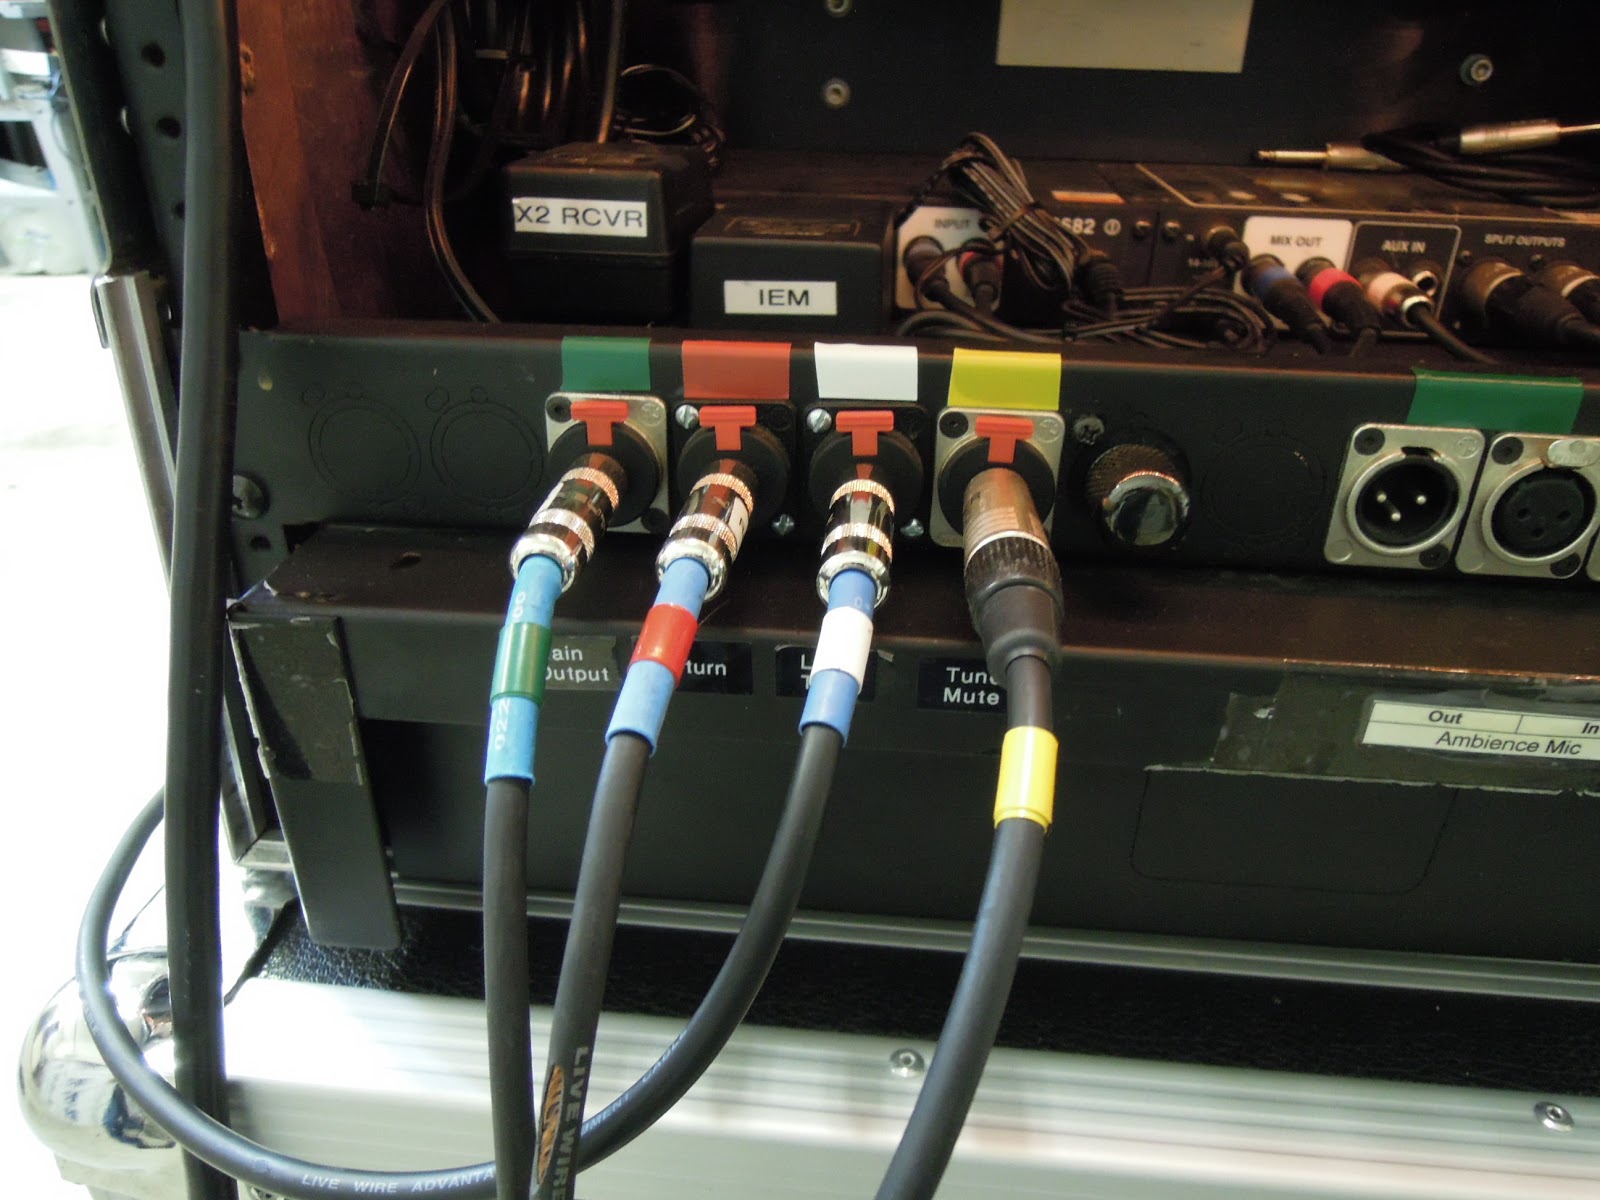
So, if it's really late (or early) and you've had a few drinks, could you hook this up?


If you can still match up colors, yes you can! 


How hard did you have to think about that?  You shouldn't have had to think at all...we match colors up in our heads a lot faster than we read and process text.

Don't get me wrong, text is still a darned handy thing to have when you're troubleshooting a problem. And sometimes, you have to hook up to systems other than yours..."Red" won't mean anything to a house sound man, but "KC-Vocal Mic" would.


You've just seen a real world example of the "4 x 4" test.  If you can hook it up at 4:00 in the morning after 4 beers, it passes.  And yes, I personally test each system I assemble this way.

Now, the next question I normally get is "what happens if I do make a mistake hooking it up".  The answer is "no damage will occur".  It might not work the way you expect, but you're not going to blow anything up.  When the guitar shows up on the vocal channel, you can recheck your work, swap cables, and go on with setting up the show.

This is where connector selection is really important.  In all of these snakes and bundles that you've seen, similar connectors carry similar signals.  In other words, you can't hook the output of an amplifier to the input of a mixer (that would in fact damage the mixer).  The worst that happens is you either get no signal or the channels are misassigned.  But nothing goes up in smoke.

By the way, here's a complete shot of the back of my main guitar/bass rack I use live:

The cables inside are color coded to where they plug in (just in case something comes loose during transit).  You'll also notice that the power supplies on the left side are labelled as to what they are feeding.  And I got tired of holding a flashlight every time I went to hook this up...hence the rope light.

Finally, here's a time saver that doesn't have anything to do with cables.  When you bring a rack or a case in, there's a 50/50 chance you're going to put it in place facing wrong or open up the side you don't want. 

A Sharpie fixes that...


Again, the purpose of all of these exercises is to remove as much "thinking" from set up as possible.  A minute here, a couple of minutes there might not seem like much.  But trust me, I've seen set up times cut in half just by making things 4 x 4 certified.

Next time, I want to talk about things you should have in your tool box.  If you use electricity, cables, or are your own instrument tech then there will be info you can use.

Until then, keep the meters out of the red!

Ken


Ken Carver has been a musician and performer since the early 70's, and involved with live music production since the mid 70's. He worked for 15 years as a broadcast engineer, building numerous studios and transmitter sites around Texas. He's also worked in Critical Care Communications for the medical industry, R&D for an automated lighting manufacturer, and owned Project Lighting & Sound in the 80's. He currently heads up an R&D Hardware Technician Team at National Instruments in Austin, and still performs on the weekends in the Central Texas area. You can reach Ken at kcarvertx@gmail.com

Saturday, October 13, 2012

Repetitive And Redundant Moves

It never ceases to amaze me how hard musicians and technicians work to make something difficult.  They will make several moves when, with a little prep work, only one would be sufficient.

Let me ask you this, would you make 12 trips to the grocery store to get a dozen eggs?  No, you pick up 12 eggs all bundled together in a carton, and do it in one trip.

Hooking up sound (and lighting) systems is much the same way.  If you know you need to run two speaker cables to a PA stack every time you set up, why are you running them one at a time?  This is where the idea of cable bundles comes in...group cables that have a common source and destination together.  Then, you just run one bundle instead of several individual cables.


Here's a real world example from one of my PA systems.  We use a passive 3-way top and powered subwoofer per side.  That requires a speaker level output for the top, a line level signal to the sub, and power for the sub.  All 3 cables are all bundled together and run from the main rack to the speaker stack.  That saves 4 minutes in set up.

Do that twice (once for each side), and you just saved 7 or 8 minutes.


This not only works for PA, but for guitar rigs.  Here's the snake that runs from  my guitar pedal board I use with The Rhythm Dawgs.

There's a lot going on here, as there are 5 lines running between the board and my rack and amp (Send, Return A, Return B, Mic Send, Amp Control, and output from the Talk Box amp).  

Before making this bundle, it was 12 minutes to hook up the pedal board.  Now it's 3.  And because everything is color coded, it's a lot easier to hook it up right the first time.


Once you get above 6 or 7 lines that you need to run for any distance, I usually recommend sub-snakes to clean things up.  I'll almost always use one for the drums, as mic'ing up a kit can involve 8 or more channels (depending on how crazy you want to get).  You're still going to be plugging in the same number of mics, but it's a lot easier to run a mic cable 5-10 feet (to the sub snake) than it is 20-30 feet back to a mixer.


In The Michael Ingalls Band, we use a stage snake physically located between the drums and the bass stack.  

It not only sends the drums, bass DI, and vocals back to the board, it also returns the stage left PA feed and two monitor sends. That's 13 signals on one cable...a huge time saver.  (The "D" return in the upper right hand corner is just for the drummer during breaks.)


  Are there there things that you should not bundle together?  Absolutely.  You don't want to bundle mic or instrument lines together with AC power (especially if the power cable is feeding something with a heavy current draw).  You might can get away with it with balanced audio cables.  With unbalanced (like a guitar cable), you're asking for hum and noise to get into your signal path.
You're safe bundling power and speaker level cables together.  You're usually OK with power, speaker, and line level (-10dBm) together, but I don't put mic lines and power together.  I've seen the math behind the reasoning, and it ain't pretty.

So take a look at your setup, and see what can get consolidated together.  

The main thing to keep in mind when bundling cables together is to clearly mark what cable is carrying what signal.  You don't want to negate any time savings you get with running cable bundles by have to figure out what plugs into what.  

It the example I used earlier with the PA stack, the 3 cables all have different connectors on them (a Neutrik NL4, and XLR, and an IEC power).  In this scenario, you simply can't hook it up wrong.  

But what do you do when you have several of the same connector, be it XLR's, 1/4" phone, or whatever?  Ah grasshopper...this is where you learn the wisdom of the 4 by 4 test!  And that's what we'll touch on next week.

Until then, keep the meters out of the red!

Ken


Ken Carver has been a musician and performer since the early 70's, and involved with live music production since the mid 70's.  He worked for 15 years as a broadcast engineer, building numerous studios and transmitter sites around Texas.  He's also worked in Critical Care Communications for the medical industry, R&D for an automated lighting manufacturer, and owned Project Lighting & Sound in the 80's.  He currently heads up an R&D Hardware Technician Team at National Instruments in Austin, and still performs on the weekends in the Central Texas area.  You can reach Ken at kcarvertx@gmail.com

Sunday, October 7, 2012

The Show Starts At Load In

If you're in a band that is at the point where they can afford a road crew, you can skip this week's installment.  However, if you're like the majority of us working stiffs and are still setting up your own shows, then stick around.  In fact if you do have a crew, make sure they read this.  They're representing you before you get to the venue.

Most bands have the mindset that the show starts with the first song of the night (OK, maybe it starts with a shot, then the first song of the night).  But when you're working for a venue, you're "on stage" as soon as you start loading in.  Yep...people start watching then.  And if people are watching, then you're in the spot light whether you want to be or not.

Don't be super concerned about the general patrons in the room, although you do want to be nice to 'em (and you'll always get the "what kind of music do y'all play" questions).  No, you want the manager and any bar staff working there to see a group of professionals show up with the right tools and the know-how to put a production together.  Let's first talk about how not to do it, because I can find far more examples of that.

Our band, "Nitro & The Fart Knockers" roll in at 6:00PM for a show at 7:30 (which is actually really early for Austin bands...most wouldn't get there until 7:00).  They drag their in their gear in cardboard boxes, trash bags, and just piled up in their arms.  Cables are hopeless tangled, and no one can find what they need because all of the wiring has been thrown into one Charmin toilet paper box that's been reinforced with duct tape (now that's rock-n-roll).

The bassist has to putz with his amp for several minutes to get it to work (only to find out he's get 2 bad cables from the above mentioned toilet paper "road case").  By this time, the guitarist (who has his rig up, running, and set to "stun") is practicing the stuff he should have worked out for rehearsal the previous week, and the lead singer (who considers himself "set up" once he plugs in his mic) is at the bar trying to "catch up" with his girlfriend who has been slamming Jello shots since they got there.

By the time they start (late, because someone had to go back for their mic), the singer is slurring, the guitarist has driven away several patrons, and no one bothered to check the sound out front...because if they had they would have realized that it was predominately "cowbell".

The club manager has been watching all of this, and by now has decided that Nitro and his band should have never left the garage they came from.  They finish the night (early, because the singer's girlfriend was bored and had to go...true story). But, there is little pay and no invite back. 

Their down fall started when they walked in.  Why?  Because they simply didn't appear to know what they're doing.  That, and a lot of rookie mistakes cost them any chance of getting another gig at that venue.  And here's a news flash:
Ken's Road Tip #93  - Club owners talk more to other club owners about their bad bands than their good ones.
It's like the old saying "bad news travels fast".  When you're screwing up club dates, your reputation will be ahead of you when you look for your next venue.

So, what should have happened?  Easy... at least give the appearance that you know what you're doing and that you have the tools (gear) to do the job at hand.  You need to look like you play for a living.  Sure, your friends know you have a day gig (almost mandatory at even regional band levels now), but they don't want to think about that. Everyone is there to be entertained.


After years of slugging it out in clubs, here's what I've found (based on personal experience and feedback from club owners I know well and respect) as to what they want to see in their bands:


Show up with time to spare - You're going to see this mantra over and over again here. Being rushed, having technical problems, and running late are the best ways to get a show off to a lousy start.  Always over estimate how long it's going to take you to set up and get ready.  

Don't look like you just bought your gear at a garage sale - A mechanic doesn't carry his tools around loose in the back of his pickup.  Why should you?  If you've made an investment in the gear you need to play, make sure you have it packed in something to protect it to and from the shows.  The best piece of equipment is no good to you if it shows up broken.  I'm not saying you have to go invest thousands of dollars in flight-rated road cases, but at least go to The Container Store and get some storage tubs to carry cables and small parts around in.  And unless you want to call attention to them, get 'em in black please. Otherwise, people will be staring at the stack of powder blue storage bins in the corner instead of watching you.

You're not set up until the entire band is set up - Some band members will be up and running quicker than others.  Drummers usually have the greatest number of individual pieces to put together and will typically take the longest.  If you've got a simple rig (or done your prep work on a complex one and can slap it together fast), then see who else needs help and what needs to be done.  For our drummer friend, just handing things to them or assisting in getting them mic'd up is a huge help.  Are there cases and containers that have everything out of 'em?  Then stack 'em up in the corner and clear the stage area.  Have all the cables been run?  Good, tape 'em down so nobody trips during the show (very un-rock 'n roll). You're done when everyone is done!

If you're not playing a song, you don't need to be playing - Guitarists....having your rig up and running is not a license to endlessly noodle. (Note:  This is a leading cause of guitarists being hit by blunt objects at gigs). All you want to do is just want to make sure that everything is working, and that should only take a minute or two.  There's no need to play the 12 minute version of "Green Grass & High Tides" to check your amp and pedal settings.  Trust me, you're not impressing anyone but the thrice-divorced cougar at the bar who's been there drinking since noon.

Know how to hook your stuff up - Seems simple, right?  You would be surprised.  Granted, not everyone is an electrical engineer, but if you've packaged your systems right, then everything should connect up and work first time you turn it on.  When I build a system (either for myself or another band), it has to pass my "4 by 4" test.  More on that in the near future.

Make it look like a stage, not a storage unit - It just kills me to see how many bands leave empty crates and guitar cases laying around on stage.  When's the last time you went to a concert and saw that?  We might not be playing on a 60' x 40' stage with a wall of amps behind us, but you can at least put away the empty cases and containers to make the stage look better.  And for you guitarists who leave their case on stage to lay your guitar in between sets...are you nuts?  You might as well put a sign on the floor pointing to it that says "Drunks...step this way to destroy an instrument" (I witnessed a gorgeous Takamine crushed by a size 11 boot in this manner). Invest $10 and get a guitar stand, will ya?

The show isn't over until everything is loaded out - After 4 sets, you're earned a few minutes to sit down and catch your breath.  It's also a good time to go around and thank people for coming out.  But, remember that the club employees (at least one of 'em) can't go home until you're loaded out.  If you have a small rig, it might not be that big of a deal.  But if you carry a lot of production, make sure you're not keeping them waiting unnecessarily.

In short, just looking like you know what you're doing goes a long way.  I'm not the greatest musician in Austin...but I can tell you that the bands I'm associated look and carry ourselves more professionally than most on our circuit, and we'll do our best to deliver a quality product every time.  It's rare that my bands don't get invited back to a venue.  The few times that has happened, it's always because we just were not a good fit musically for the room.  And that's OK...different venues want different things and there are few one-size-fits-all bands.   But it's never been because we were anything short of professional or failed to put on a quality show.

Next up, we'll probably spend at least a couple of weeks on the technical side of putting audio systems together and hooking things up.  I'll explain my "4 by 4" test that every system I build has to pass, and how you can use a lot of the same tricks on your existing system for very little money.  

Until next time, keep the meters out of the red!


Ken


Ken Carver has been a musician and performer since the early 70's, and involved with live music production since the mid 70's.  He worked for 15 years as a broadcast engineer, building numerous studios and transmitter sites around Texas.  He's also worked in Critical Care Communications for the medical industry, R&D for an automated lighting manufacturer, and owned Project Lighting & Sound in the 80's.  He currently heads up an R&D Hardware Technician Team at National Instruments in Austin, and still performs on the weekends in the Central Texas area.  You can reach Ken at kcarvertx@gmail.com.