Saturday, March 30, 2013

What Do You Mean "It's Not Working"?

If there's one thing I've learned in almost four decades of performing, it's that it's not a case of "if" you're going to have a failure at a show, but "when".  And most of the time, that "when" is right before your scheduled to start.

This week's article is going to center around PA system failures, how to locate the problem and how best to fix it on the spot.  But keep in mind that these techniques can be applied to any sound system (namely guitar and bass rigs).

The first thing to do is not panic.  When you freak out, you rush and usually overlook the simple things.  As long as there hasn't been a loud "bang" and smoke isn't pouring out of your amp rack, there's a very good chance that you're going to be able to recover.  You might have somewhat reduced capacity (channels, power, etc), but you'll probably be able to play the show.  

The trick to troubleshooting a problem...divide and conquer.  Don't try to look at your entire system at once.  Instead, think about your system in blocks, with the signal starting at the microphone and ending at the speakers.

It Ain't Got No Gas In It...
Before you go ripping things apart, is everything that needs to be plugged in actually connected to a power source?  Yeah, I know...seems overly simple.  But I've been tripped up by this, and have actually seen the drive rack of an arena sized system (with 16,000 people in the audience) ripped apart only to find out that a breaker was inadvertently shut off.
Most gear has some kind of light on it to indicate power, but not always.  I'm the proud owner of a few EV powered subwoofers that have no indicators on them at all.  I had one that wasn't functioning at a show, and started swapping the signal cables to it.  Come to find out that the IEC power connector was partially out of the socket, and I hadn't seen that (black connector, black speaker, dark club).  Pushing that back in solved the problem.  By the way, have I ever ranted about how much I hate IEC connectors?  On the next performance break, those are getting retrofitted to Neutrik Powercon connectors.

Get The Easy Stuff Out Of The Way
It's not dumb stuff...it's only dumb if you blow past it.  Every connection point in a system is a potential location for either an error or failure.  I did some quick addition, and with The Rhythm Dawgs sound system, there are about 400 total connection points for audio.  If you just consider 1 microphone through to the speakers, there's 32 total points (if you include the monitors).  And all it takes is one to go down.

So make sure the easy solutions are checked.  Are the mics actually plugged in (and if you're using sub-snakes, do forget to check there.

How Bad Is It?
Is the whole PA not working, or just a single mic?  If the entire PA is down, then think about it logically.  Which is the more plausible situation:

 - All the channels on the board went down at the same time
 - All of my mics and/or cables are bad
 - I don't have the crossover or amp turned on

I gotta go with the last one.  Unless you've had an electrical event (surge, brown-out, etc) then you usually just have a single fault to deal with.  If the whole system isn't working, then start at the speakers and work back down the speaker cables to the amps, then the crossover, and then back to the board.

If you can hear a hiss coming out of the horns on the PA, then you can assume that the power amps are working.  

Remember, think single-fault.  Ask yourself "what one piece of equipment can take out the whole PA?".  

Of course, there have been those times when I've found a bum mic, a bad cord, and a failed compressor in the same night.  But those showed up as 3 different channels that didn't work.

Look At All The Pretty Lights...
Yeah, all those sexy LEDs on your equipment aren't just there for the bling factor...they can actually tell you what's going on (and through) your gear.


On most mixers, each channel has an overload indicator to assist you in setting up the gain structure.  Then, there are likely meters on the sub groups and mains.  

So, start with the channel strip and make sure you're at least getting to there.


This is from a Carvin console, but they all work about the same (unless you're dealing with a digital desk, and that's another article).  The Input Gain should be turned up to the point to where the Level Indicator is flashing.  Note that this is independent of the level of the main slider.  Don't worry about that yet...we'll get to it.

If you don't have anything going on here, you've got one of these issues to deal with:
 - The channel on the board is bad...try another
 - The cable between the mic and the board is bad...swap it out
 - The mic itself is bad...try another mic
 - The mic was plugged into the wrong channel...follow and check the wiring

Assuming things are hooked up correctly, then the cable is usually the first suspect.


If you've got signal to the channel strip, turn up the channel fader, the subgroups, and the main fader.  

Still nothing?  Is the channel assigned to an output?  This is an easy place to get tripped up.  Unless you tell the channel what to output to...it's going nowhere (except the monitor bus).  When I'm troubleshooting a channel problem, I like to assign the channel directly to the main output bus (usually marked L-R on the assign switches).  Now, you should have some indication of signal on the output meters.


If the channel works to the main outputs, but not the subgroups, then make sure that the subgroups are assigned to an output.  In this case, each sub can be assigned to left, right, or both.  And again, if nothing is selected there's nowhere for the signal to go.

Any failures after the console will tend to take out the entire system.  That is, nothing will be able to get through.

We're Out Of Time
If you're lucky, you find your issues when you set up and sound check.  However, there's a corollary to Murphy's Law that states the likelihood of a system failure 5 minutes before showtime is directly proportional to the number of people waiting for you to start.

So, how do you handle a last minute failure quickly?  Like I said earlier, don't panic...nobody has died because a show started late.  (If that was the case, Guns 'n Roses would have killed several million people in the 80's).

Is it a system failure or a channel failure?  Just remember that: 
 - For a system failure, start at the speakers and work back to the amp rack and mixer.
 - For a channel failure, start at the source (mic, DI, etc), and work to the mixer.

If you've got a fairly complex system, do yourself a favor sometime and sketch out the signal flow.  It doesn't have to be a work of art, but included each piece of gear from the mixer input to the speakers.  Here's one I did in about 5 minutes:


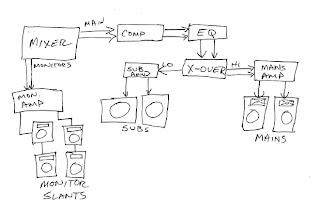
It ain't pretty, but if I'm tired / drunk / whatever...this will jog my memory.  Make your own chart, put it in a plastic sheet protector, and tape it in your amp rack.  You'll thank yourself later.

In this article we had a brief mention of subgroups on a mixer.  I find that, after gain structure, this is a fairly misunderstood feature.  Subgroups used to be a feature that you only found on large high channel count boards...now their everywhere.  


Next week we'll talk about strategies on how best to utilize subgroups to make your mixing easier.  We'll also be talking about the benefits of group compression (which I'm loving on my new StudioLive 24.4.2), so if you've forgotten most of it, re-read my article "Putting The Squeeze On" to review compression basics.

Until then, keep the meters out of the red moving!

Ken


Ken Carver has been a musician and performer since the early 70's, and involved with live music production since the mid 70's. He worked for 15 years as a broadcast engineer, building numerous studios and transmitter sites around Texas. He's also worked in Critical Care Communications for the medical industry, R&D for an automated lighting manufacturer, and owned Project Lighting & Sound in the 80's. He currently heads up an R&D Hardware Technician Team at National Instruments in Austin, and still performs on the weekends in the Central Texas area. You can reach Ken at itsjustlogistics@gmail.com


Saturday, March 23, 2013

How Do You Get To Carnegie Hall?

Last week, we talked about finding a place to hold full band rehearsals.  At this point, I'll assume you've been successful in finding a spot, and have a sensible set up.  Now, let's move on the the actual rehearsal.

It's amazing to me how much gets accomplished in some band rehearsals, and yet so little in others.  As I said last week, sometimes you walk out with 3 or 4 new songs ready to go.  Other times, all you've got to show for an afternoon's work is a bunch of empty bottles.

I tried to identify the traits of productive band practice for this week's article.  This is what I came up with:

Why Are We All Here?
Seems like a simple question, but one that doesn't get asked enough.  For me, if you're getting the band together with your instruments, then you're likely going to do one of these activities:
 - Learn some new songs
 - Go over material that you need to brush up on
 - Jam, with no particular goals in mind

If you're wanting to just jam and come up with ideas for songs, then the structure is likely no structure at all.  The only suggestion I would give you there is make sure that some kind of recorder is running.  I can't tell you how many times someone played a brilliant lick, only to not remember it 2 minutes later.  Don't let those "flashes of genius" get away from you.

How Does That Go Again?
If you've been together for any length of time, you've likely amassed a catalog of songs that exceeds the number of tunes you play on a typical gig.  If there's something you haven't played in a while, then it's probably a good idea to go over it in rehearsal to make sure everyone remembers the changes.  

This is where writing your set list for a show early can be a big help.  You've got a good idea on what you're going to be playing, and what you haven't touched in a while.  
 
If it's something you haven't touched in a while, play the entire song through at least once.  Stop if someone stumbles and work the part out right there.  It's the simple songs that are the ones that will trip you up.  I remember one show where I nailed the vocal and solo to  Burnin' For You by Blue Oyster Cult, only to trip up on Louie Louie later that evening.  

It Would Be Cool If We Did....
Ahhh, new tunes.  The life blood of any band (unless you're an established classic rock band on the state fair circuit...then who cares).  For me, one of the most exciting aspects of playing live is trying new material out in front of an audience for the first time.  You know pretty quick what works and what doesn't.
 
I can't preach this mantra enough, because it's been a major source of frustration for me in some bands.  

"Learn your parts on your time, not the band's"
Rehearsal should be for putting the arrangement together and working out harmonies.  Failing to do your homework and then showing up unprepared sends the message that you don't respect your bandmate's time.  Sure, things happen and schedules change.  But, at least have the courtesy to let the rest of the group know that you're not going to be ready.  
 
More than once I've pulled all-nighters to learn songs for a rehearsal (because I'm not going to be "that guy"), only to walk in find out one of the band members "...sorta listened to the song on the way to practice."  Really?  Look up "lame a$$" in the dictionary...I'm pretty sure that's one of the definitions.

It Still Should Be Fun
You know that "jam" thing I talked about earlier?  That's how we'll start a lot of rehearsals in one of my bands.  You know...you're setting up your stuff and tuning up, and just start playing a riff.  Most of the time, the rest of the band will jump in.  It's a great way to check everything out, make sure everyone can hear what they need, and loosen up before getting to work.

Stay On Target
If you're working on new or established material...just work on that!  Breaking off into a song that's completely outside of the band's format just because you like it is funny...for about 3 seconds.  If you're not playing the material you care for, then reconsider where you're at.  Life is too short to be playing stuff you don't like (unless you're getting an obscene amount of money for it).

 
Wait To Be Called On...
If a couple of band members are discussing a part, that's not your cue to start noodling on your instrument.  If you want to work a part out on your own, turn your instrument down.  Guitarists (and I'm guilty as well) tend to be the worst offenders.  Trust me...it's OK for 30 seconds to pass without sound coming from your amp....the Earth's rotation won't be altered for a lack of your sonic presence.

 
Take Care Of Business
Before you break for the night, make sure everyone knows the next events for the band.  This would include things like:

 - When is the next time you're rehearsing
 - What are the next songs we're working on 
 - If there's a gig coming up, what time and where do you meet
 
Follow up with an email...especially if there's been some consumption of adult beverages.

And That's A Wrap
When you're done, if you're rehearsing at a band member's garage or house, take the time to pick up your trash.  If furniture got moved to accommodate practice, help move it back.  If you drank somebody else's beer, bring a six-pack to share next time.
 
If you're at a rehearsal studio, you definitely need to pick up.  Some places will charge you extra if they have to clean up after you.  Leave the room trashed, and there's not much motivation to rent time to you again.
 
If you're renting a lock out or warehouse space, take the time every now and then to all get together and just clean it up.  When I used to practice at a storage unit, we would take everything out every couple of months and take a leaf blower to the place.   Personally, I work better in a somewhat clean environment.  I'm not talking operating room sterile here, but if the floor is so sticky from spilled beer that my boot comes off...it's time to clean.

This is how I approach a rehearsal...and while it works for me and the bands I'm associated with it will vary with the dynamic in different groups.  If you and your ensemble are happy with the results that you're getting from your rehearsal time, then whatever you're doing is working for you.
 
Next week, I'm going to get back on the technical track.  We used to have a saying in Buzzfuel...."It's not a Buzzfuel gig until something breaks".  I thought I would go over some system level troubleshooting techniques that you can use at a show.  These won't require an advanced degree or any specialized equipment.  A flash light, a spare cable, and of course duct tape is usually all you need.
 
Until then, keep the meters out of the red.

Ken

Ken Carver has been a musician and performer since the early 70's, and involved with live music production since the mid 70's. He worked for 15 years as a broadcast engineer, building numerous studios and transmitter sites around Texas. He's also worked in Critical Care Communications for the medical industry, R&D for an automated lighting manufacturer, and owned Project Lighting & Sound in the 80's. He currently heads up an R&D Hardware Technician Team at National Instruments in Austin, and still performs on the weekends in the Central Texas area. You can reach Ken at itsjustlogistics@gmail.com


Saturday, March 16, 2013

Turn That $#!+ Down!!!!

Getting yelled at to turn down when you're trying to practice seems as much a rite of passage for a musician as getting your first callus, breaking your first string, or getting hit on because you play.

When you're starting out and playing by yourself, it's no big deal.  But when you get a band together and you're actually trying to learn songs it gets a little tougher.

Sometimes, the biggest challenge for rehearsing a band isn't getting the group together...it's having a place to do it.

Park It
Countless bands and musicians have launched (and ended) their careers in the garage.  In fact, playing in a garage is almost a requirement before you can really call yourself a musician.  

The upside is you've got some room and it's usually free.  The downside is that garages are anything but sound proof.  And forget about putting styrofoam, fiberglass, egg cartons or anything else silly on the garage door to "sound proof" it....it doesn't work.  Why?  Garage doors are meant to move, and when things move, they retransmit sound.  If you're trying to control the sound getting out, your only real choice is to built a wall inside the garage door.  Unfortunately, that then precludes parking a car in there.

And we won't talk about the climate considerations if you're a Texas band trying to do this during the months of June through September.

Rent It
More and more pay-by-the-hour rehearsal places are popping up, at least here in the Austin area.  Some Guitar Centers are starting to have rehearsal space attached to them (we got the first in the state in Round Rock).  The GC rooms are really nice....complete drums and amp back line, and PA.  Just bring your instruments and plug in.  It's also air conditioned / heated as well (which is something your garage is likely lacking).  But, that comes at a price...$18 an hour around here.  If you're going to go this route, you need to have your rehearsal planned out (unless you're just going to jam for song ideas).

Other places are not quite as fancy, but aren't as expensive.  There's another studio in Round Rock owned by a good friend of mine (Austin To Boston) that has several rehearsal rooms attached to it (and you can rent the big studio to rehearse in if he's not recording).  Something like that goes for around $30 for 3 hours.  However, you'll need to bring your amps and drums.  Rooms like this come with a small PA.

You Got Me Locked Out
Along the lines of renting a room by the hour is the "lock-out".  This is basically a monthly rental of a rehearsal space.  You can leave your stuff set-up and jam whenever you want.  But, you're typically looking at $400 a month minimum.  A lot of bands in the area will split a lock-out with another band or two.  That works as long as there's someone from each band in charge of coordinating with the others on when everyone is going to use the room.

Look At All This Storage...
Yep...sometimes you can actually rent a storage unit and rehearse in it.  Obviously, there needs to be some electricity, and you need to talk to the owner and let 'em know what you're planning on doing.  Some places are cool with it...others not so much.

I went this route for a few years with a band back in the 80's.  Yeah, it's was kind of like the garage (no heat / AC), but it worked well.  There was an outlet right outside our unit.  We hung a couple of florescent lights in there and we were good to go.  I believe we had a 10x20 (and were about to expand to a 20 x 20 when things ground to halt).  It served the purpose...we learned a lot of songs in the "Metal Shop" as we called it.

High Tech Approach
In-ear and headphone monitor systems have come a long way in the last 10 years...to the point that you can rehearse with next to no volume if you want to.  With the advent of guitar amp modelers (like the Line 6 POD) and mixers with fairly extensive monitor mix options,  it's practical to get your rehearsal in under headphones.  If your drummer has an electronic set, you won't make any noise except for vocals.  (Caution: I know a screamo band in Austin that rehearsed like this but still had the cops show up at their house.  Turns out that a neighbor called...but not because of the noise.  She thought someone was getting beat up!).

OK...you knew we had to get a little technical, so here goes.  The AUX outputs on most mixers will drive a set of headphones to a moderate volume.  You'll just need a mono to stereo adapter so that the sound comes out of both earphones. 

This will get you from the output jack on your mixer to the 3.5mm connection most headphones use now.  Pick up an extension cable (you can get a 12' one for about $5) and you're all set.


Where Does This Wire Go?
One of the disadvantages of using a mixer for headphone practice is that it's not always really straight forward on how to hook up. You need to have a thorough understanding of the signal flow through the mixer to make that work correctly.  

The slickest piece of rehearsal gear I've seen in a long time is a device called a Jam Hub


They've taken most of the complexity out of the wiring and signal routing and given everyone in the band the ability to create their own mix.  One of their models even has on-board recording for capturing and critiquing your rehearsals.  You can get into a system like this starting at about $300.  If you rehearse regularly and pay by the hour, you'll recoup that money pretty quick.

Of Course, There's Always....
Yeah, this isn't very "rock-n-roll" of me to say, but nonetheless practicing quietly is an option and will give you a very different prospective of what's going on.  

Lately, The Rhythm Dawgs have been rehearsing in my home studio.  I've got 2 combo guitar amps and a small bass amp that we plug into.  The drummer brings his kick, snare, and high hat.  We stuff a towel in the front port on his kick and lay another one over his snare.  He plays with power rods, and we're able to sing without a PA or monitors of any kind.  

Doing that, there is no hiding anything.  We've worked kinks out of songs that we've been playing "wrong" for years doing this.  

Now, does that mean we're done with full-on electric rehearsals?  Nope.  We find that the low level rehearsals are great for brushing up on stuff that we haven't played in a while , but for learning new material having a full-on electric rehearsal still seems to be the way to go.


Really?  You Need That?
It has always been an endless source of amusement for me to see bands squeeze 2 Marshall full stacks, an Ampeg SVT, and 10 piece drum kit into a 10' x 10' room and expect to get anything done.  Yeah, I went through the volume thing (and I'm paying for it now), and maybe that's another "right of passage".  Perhaps it's just the geezer in me coming out, but unless you're renting an aircraft carrier for a full technical rehearsal anyone who shows up for rehearsal with a full concert system needs a swift kick to the jewels and sent home to think about their poor decisions.  Seriously...if all your band has going for it is volume than just skip rehearsal and get your gig at Headhunter's in Austin (recently named "Worst Club in the US" by Bar Rescue)...you'll fit right in.


Now that we've talked about the "where", next week let's talk about the "how".  I've been in bands where we can rehearse for 3 hours and come out with 5 new songs.  I've been in others whether the only thing we could show for an afternoon's work was 12 empty beer cans (not that that's always a bad thing).  We'll talk about optimizing your rehearsal time next week.

Until then, keep the meters out of the red!

Ken


Ken Carver has been a musician and performer since the early 70's, and involved with live music production since the mid 70's. He worked for 15 years as a broadcast engineer, building numerous studios and transmitter sites around Texas. He's also worked in Critical Care Communications for the medical industry, R&D for an automated lighting manufacturer, and owned Project Lighting & Sound in the 80's. He currently heads up an R&D Hardware Technician Team at National Instruments in Austin, and still performs on the weekends in the Central Texas area. You can reach Ken at itsjustlogistics@gmail.com


Saturday, March 9, 2013

So many gigs...so little time.

Sorry guys, but due to a very heavy rehearsal and performance schedule this week, there's no article today.  Besides, with Grumpy Cat in town nobody's on the Internet this weekend.

We'll be back next Saturday.

Saturday, March 2, 2013

Pedals To The Metal - Part 2


Last week, we talked about pedal layout and the implication of how you order them in the signal chain.  This week, we'll concentrate on getting everything packaged up and ready to the stage. 

Once again, please keep in mind that's I'm not trying to make any artistic decisions here for you.  It's your sound.  I just want to help you get everything so that you can set up quick, play the show reliably, and get out!

First, what are we mounting everything to?  You can get as fancy as you want here.  It's no secret that I'm a big fan of Pedaltrain products these days...I've built a half dozen systems on their products (and we'll look at at few in a bit).  But never underestimate the power of a piece of plywood!


I figure if a guy like Eric Johnson is cool with using something like this, it's all good (and it's legendary as to how much Eric is a tone fanatic).  If you go this route...get PLYWOOD (preferably at least BC grade).  Do not get OSB unless you like to break chunks of wood under your fingernails just before you play.  MDF isn't bad as long as you paint it.  Otherwise, the first time you spill a drink it will bubble up and warp.  And as far as the size...you figured that out last week.  But, you still want to dry fit everything to make sure it fits and you can get to everything you want.

More Power To You
Adding a reliable source of power to a set up is an important consideration.  Some guys insist on batteries.  If you've only got a couple of pedals and they aren't huge current hogs, then knock yourself out.  But, if it's an involved rig you really owe it to yourself to look at some of the supplies out there now.

You've essentially got two choices in the matter...a switching supply or linear supply.  I know...I just heard a couple of heads explode.  I'll explain...

A switching power supply is similar to what's in your computer.  Without getting into magnetics theory here, I'll try to simplify this.  By converting the AC into DC at a much higher frequency, the transformer can get a lot smaller.  And by controlling the duty cycle of the supply to regulate the voltage (in other words, turning it on and off very quickly) instead of just dumping the excess power into a heat sink, it gets very efficient (on the order of 90%).  The drawbacks to these are they are more complex and they tend to generate their own noise.  The outputs are typically not isolated either, which can make for ground loops. 

A good example of a switching supply is the Visual Sound 1-Spot.  You get a lot of energy in small space.

A linear supply is what we (at least those of us born prior to the 80's) grew up with.  It involves a transformer, rectifier, filter and regulator.  The big wall warts you used to see...those are linear.  The advantage to the is that they are robust and electrically very quiet.  The downsides...they're larger and not super efficient (about 30-40% of the electricity you use is lost as heat).  Examples of linear supplies for pedalboards would be Voodoo Labs Pedal Power, Decibel 11 Hot Stone, or the Cioks DC series.  The biggest advantage (to me at least) is that these supplies isolate the outputs from each other.  That means if one pedal shorts out, it doesn't take the whole board down.  It also eliminates ground loops between the pedals. 

Unless a client has a really good reason to do otherwise, I always insist on building with one of these supplies.  One additional bonus...if I'm using a Pedaltrain board I have the option to mount the supply underneath (because you really shouldn't need to step on the supply during a show...unless you're a punk band....then it's cool...I guess).

Getting Attached
I used to accept nothing but screwing down a pedal.  And for really heavy (weight wise) devices, that's still a good way to go.  But there have been some big advances in adhesives and hook-loop attachment systems (the generic name for Velcro).  I'm a big fan of the 3M Dual Lock system...it has about 4x the holding power of the cheap stuff that's out there.  The only trick is that the surfaces you apply them to have to be extremely clean.  Take the time to wipe the surfaces down with Isopropyl or Denatured alcohol before attaching it. 

If you want to use screws, there are some handy devices out there now which let you do that without damaging your pedals.  I don't like them, but they're essentially a de-constructed bicycle chain...but to each his own.

The Cable's Out....
Yeah, you sort of need to hook this stuff up, right.  Again...a couple of major choices, and they depend on whether you can solder or not.

For those of us who do solder, you've got the advantage of picking your materials.  For pedal interconnect, it's Mogami 2319 for me.  It's small, easy to strip and work with, and has really good signal integrity.  As far a plugs go, I'll use Neutrik straight and right angle connectors if I have room.  If things are cramped, then I'll go with Switchcraft 226, or 228 if things are really tight.  Make sure you read the directions for how much insulation to strip back.

I'm not a fan of the solderless stuff out there because of two reasons.  First, the connector dictates the wire you have to use.  Second, your connection is held together by pressure.  A lot of people use these systems, and if you put things together correctly they work well.  But, you have to be very careful when connecting and disconnecting things...the connection is just not as rugged as a solder joint.

George L systems are very, very good sounding cables.  And like the Mogami cable, the stuff he uses is small and easy to work with.  And again, tone fiend Eric Johnson uses these on his systems.  I've done a board with Lava Solderless Connectors.  It's held up well and sounds good, but the cable is really thick (for what it needs to be) and was a pain to work with.

Got The Hook Up?
Yep...you're there.  If you're using hook-loop (OK...Velcro) to attach the pedals, you can afford to put them right up next to each other (just plug 'em in before you attach them).  If you're using a more permanent attachment method, you should try to leave room to unplug the cables should you need to take a pedal out of the signal chain at a gig.

Here's a fairly simple board I did for John Cortell of Buzzfuel a few years ago:


John's board was a little unusual in that we incorporated his wireless reciever on the board.  I normally like to get those up in the air, but he wasn't playing on huge stages and really didn't have to worry about an line-of-sight issues with the antennae.

It's built on the Pedaltrain Jr. frame with a Voodoo Labs Power Plus.  The cable is all custom made with Mogami wire and super heavy duty Neutrik connectors.  John only has to come out of the tuner (upper left), connect to his amp, and he's up and running.

The main thing I want you to notice is how the wiring is bundled together and secured to the frame.  The idea is that you don't want anything that could get snagged in transport and set up.  You don't want to give away the time you could save by having to troubleshoot a problem.

But...It's So Big...
So what do you do when your board gets to the size that it's hard to reach things with your feet?  This is where loop switchers come into play.  Loop switchers (not to be confused with Loopers, which let you record and playback sounds live) let you locate a pedal (or pedals) anywhere on the board, but control them from a more easily accessible location.  Here's a good example:

This board belongs to my son Steve.  He put it together himself (and I'm quite proud of him for that).  It's in a fairly constant state of change right now, which is why we haven't done custom cables for it yet.

In the center to the left of the volume pedal are his flanger and chorus units.  He switches those in and out quite a bit, so I built him a two section loop switch (the green box).  Now, everything he uses frequently is at the bottom of the board.

And since he gets asked about this all the time, I'll mention the silver 2-button box to the right of the loop switcher.  Those buttons are to set the tap tempo of his Boss DD-20 and Strymon Timeline delays.  They're just momentary switches, but I added some diode logic to them.  Now, if he taps the "A" button, it only affects the DD-20.  The "B" button, however, will set the tempo of both the DD-20 and the Timeline.  That was his idea...I just bolted it together.

It Keeps Going And Going And Going....
Last week I promised you a trip in the way-back machine.  Here it is:


I built this board in the mid 80's (on my parent's car port if I remember right).  The box to the right of it is the power supply...prepackaged supplies for applications like this didn't exist then so I had to build it myself.  For the geeks out there, the output impedance of the supply mimics that of a carbon battery at about 80% life (the "sweet" spot).

Nobody was really making decent A/B switch boxes yet, so that got built in.  This way, I can have two instruments hooked up and ready to go:


The "Processing" switch gives me a hard-wire bypass around the entire board if anything craps out.  There's also a Mute switch on the other end with a bi-color LED (which was pretty cutting edge back then).  I cut and built the entire frame out of 1/2" plywood.  And almost 30 years later...it's still running!

It's Your Party...
The main thing to remember is that there is no one-size-fits-all template for these things.  There are guidelines and suggestions, but the end-all goal here is to make something that works for you...no against you.  With all of the board, cable, power, and connector options out there now, it's not hard to build your own box of sonic nirvana.

Next week, I thought I would talk about one of the biggest challenges to bands...finding a place to practice!  Until then, keep the meters out of the red!

Ken

Ken Carver has been a musician and performer since the early 70's, and involved with live music production since the mid 70's. He worked for 15 years as a broadcast engineer, building numerous studios and transmitter sites around Texas. He's also worked in Critical Care Communications for the medical industry, R&D for an automated lighting manufacturer, and owned Project Lighting & Sound in the 80's. He currently heads up an R&D Hardware Technician Team at National Instruments in Austin, and still performs on the weekends in the Central Texas area. You can reach Ken at itsjustlogistics@gmail.com